Fall is in the air, which means sweet treats are on the mind. But not just any treat… we are thinking about juicy, gooey, chocolatey caramel apples! These are one of our go-to treats for fall and we cannot wait to share all of our tips and tricks so you can get the perfect results every time.
- Tip #1: Choose Your Caramel Wisely
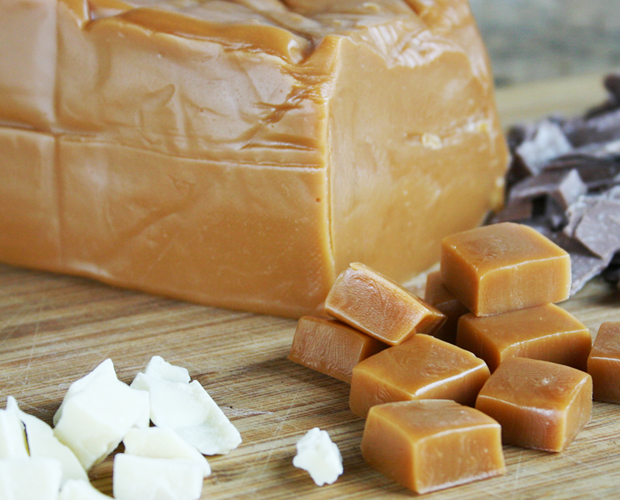
You don’t need to waste any more time unwrapping individual cubes of caramels because we have the perfect solution for you: Our 5 lb. loaf of Peters Caramel.
Trust us: Our caramel loaf is worth it. No more wasted time. No more hassle. Just smooth, creamy caramel.
This 5 lb. loaf of caramel will cover approximately 25 medium sized apples. Don’t need to use the whole entire loaf? No problem. Place the extra caramel in an air-tight container and it will keep on the shelf for 12 months.
- Tip #2: Get Rid of Shellac
Have you ever noticed how shiny apples are at the supermarket? This is because they are coated in a waxy finish called shellac. Caramel and shellac do not get along. In order to get caramel to stick to your apple, the shellac must be removed. So put on your scrubbing gloves and scrub the apples clean. You can just use warm water and an abrasive cloth. Or you can add a little dish soap to really clean things up.
- Tip #3: Say No to Puddles
After you have dipped your apple into the caramel- wait! You know the saying patience is a virtue? Well it definitely helps here. Continue holding your apple upside down for a few seconds until the caramel has a good grip on your apple. If you do this small but wise step, you won’t get the “puddle” when you place your apple onto your parchment paper. For another no-puddle guarantee, place your apples in the refrigerator until the caramel sets.
- Tip #4: Watch Out for Wax!
Wax paper is not the best non-stick to place your warm caramel apples on. The hot caramel will melt the wax and make the paper stick to your apple! But don’t worry–the best paper for it is parchment and we always have some on hand! You can simply line your baking sheets or you can cut the parchment into squares.
Now you are ready to get started! Dip in caramel, and let it set. Dip in chocolate and then your favorite topping. We love cinnamon and sugar, breakfast cereal, and our favorite candy bars. What toppings are you going to try first?
Looking for more tips? Get a great hands-on experience and more tricks on making delicious caramel apples, sign up online for our Caramel Apple Classes in the fall.
Here’s a list of other items that you will need for delicious caramel apples. Here are the basics:


Lydia Ann Dunn
July 23, 2017 at 8:44 pmI make caramel apples all the time and I’m wondering how to avoid bubbles in my caramel. They appear on my apples and I have to “pop” them, and they end up looking like craters!
Heather Smith
September 2, 2017 at 10:52 amI have found I get a lot more bubbles when I have incorporated a lot air into the caramel from stirring it. Allow the caramel to sit for a bit before dipping it in.
Hope that helps
Carolyn Harris
January 24, 2017 at 9:01 pmWhere do you buy the Peters Carmel in the block?
Heather Smith
February 21, 2017 at 5:11 pmyou can purchase the caramel through our site, or in our store in salt lake city! https://www.gygi.com/peters-5lb-caramel-loaf
Carma
October 16, 2014 at 10:43 pmAfter looking over a few of the articles on your web
page, I truly appreciate your technique of writing a blog.
I saved as a favorite it to my bookmark website list and will be checking back soon. Take a look at my website too and let me
know your opinion.
Melynne
October 29, 2012 at 10:37 pmHi, I am a native Utahn but have since moved to hot and humid Texas. This year we’re doing a fundraiser for a church group which will include chocolate/caramel dipped pretzels as well as caramel apples. This is all a grand idea…the only problem being the humidity. Is there anything that you recommend as to combat that during the cooling and storing process? Thank you!
Cait
October 30, 2012 at 10:38 amThe only thing that I can recommend is cranking up the air conditioning. This will help the humidity to decrease. Take it down to 60-65 degrees F and then you should be good to go!
Terry
October 23, 2012 at 6:38 pmI have a question. I’ve been making caramel apples for years. I use Peter’s caramel and chocolate coating . I put the apples in the refrigerator to set up, then again for a short time after the chocolate is applied. My problem is I get cracks in the chocolate. Sometimes huge cracks!!!. Some times the cracks are there when I take them out of the refrigerator or some times they appear the next day. Any suggestions to prevent these? What am I doing wrong? I would love to have apples that I wouldn’t have to drizzle to cover up cracks, but to be able to use drizzling to add eye appeal. Thank you.
Terry
Cait
October 24, 2012 at 10:14 amTerry, there are two problems that I can think of that may be causing your chocolate to crack. First off, you may be heating your chocolate to a temperature that is too high. Are you using a candy thermometer? If so, what’s the temperature you are taking it to? How are you heating it? The next problem could be that you are letting your chocolate cool in the refrigerator. When chocolate drastically changes temperatures (from a hot pot to a cold fridge) it can cause the chocolate to bloom… and it could possible cause cracking. Let me know how you are melting it and so on and then I can further assist you. Thanks!
How To: Prepare Apples for Dipping in 4 Simple Steps
September 28, 2012 at 7:01 am[…] 1- Wash Well: Most apples (unless organic) are coated with a shiny, wax finish called shellac. The shellac must be scrubbed off completely in order for the caramel to stick. The best way to do it is to scrub the apple under warm water […]
Summer’s Winding and Fall is Coming
August 27, 2012 at 10:49 am[…] Read more about these tips and how to use them, by clicking here. Tweet Pin It […]
Featured Product: It’s The Season For Caramel
July 26, 2012 at 12:29 pm[…] while we did post some helpful hints on how to dip apples, we thought we’d also post everything you need to know about our Peter’s Caramel […]
My Craft Channel: Caramel Apples Tutorial
July 26, 2012 at 12:21 pm[…] Join our very own Heather Smith as she demonstrates to Brittany of One Charming Party how to make caramel apples. […]
Gygi Guest Post Contest Winner: Deea Hobbs
July 26, 2012 at 12:06 pm[…] Caramel apples are fun & super easy to make with a few helpful hints. I always use the Peter’s Caramel Loaf. It is thick, buttery, smooth, creamy perfection! I highly recommend it! […]
My Craft Channel: Caramel Apple Video Tutorial « allthingskitchen
October 21, 2011 at 2:58 pm[…] for more tips? You should read […]